

While working with Invest Lite, the Recalculate icon will be shown in the Editor Toolbox. This feature prompts the app to update its forecast fields.
When you Save your Invest Lite, the data is stored as a file on your own computer. Invest Lite does not send or store your data anywhere else.

Any occasion where Invest Lite offers to Save, it will also provide the option to save as a named Snapshot. Taking Snapshots periodically as your project progresses, allows you to compare the state of the project between two points in time (Readmore about Snapshots).
Find explanations and help for the features of Invest below.
START SCREEN How to start your project
Automatic Estimation
DASHBOARD - SCOPE
DASHBOARD - COST
DASHBOARD - RESOURCE UTILISATION
START SCREEN
When Invest Lite starts for the first time a new project setup page is shown. This asks for some basic information.
A suitable name for your project is recommended. Start and End dates are required.
Optionally enter a budget amount with a currency type ($ or £).
If you have a saved Invest Project file, you can load it on the right-hand panel.

SUMMARY
Click on the Summary tab to review the information that you entered at first. Adjust Name, Dates and Budget here.
There is a place to keep a vision statement, which will be the original expectations of the project. Because the project goals may change independently of resource or budget considerations, it's a good idea to have evidence of what the initiative was aiming to accomplish in the first place.

ORGANISATION - Benefits and Cost

At the top level menu "Organistation", set up a Benefit with a common currency unit. Click Edit and enter a benefit name, then Save. Sterling is provided as the default unit but other options can be created. See the guide section about Units for more information.

Likewise set common cost unit.
The total of all Benefits, that will be created in the Projects tab, will all be expressed in these common currencies.
RESOURCES

Click on the Resources tab to model and manage your teams.
-
For a team whose work you will plan and estimate, choose a Velocity Estimated type.
-
For a resource that you’ll only have a delivery estimation, like an external partner team, select a Duration Estimated type.

Choose a team name and Estimation scale, such as T-Shirt. The actual value of each T-Shirt size is set in the Taxonomy tab under Lists but, if entered by Ideal Days, Invest Lite indicates the token size value anyway.
What is a T-Shirt estimation scale?
On the peg, T-shirts come in different sizes like XS, S, M, L, XL, XXL. In T-Shirt estimation scales, the size is a token for a number of working days. So XS (extra small) is five working days. S (small) is ten working days. M (medium) is twenty working days. The sizes are relatively different.
The backlog will eventually contain a list of activities that a team can perform, all of which contribute in some way to making benefit outcomes happen (more about benefit outcomes later).
This also depends on how capable a team actually is. When making these estimations, the efficiency of a team on paper is just an ideal or anticipation - although it should be based on a realistic prior knowledge of how such a team will perform when given such tasks.
At the outset your velocity estimation will not be based on anything more than expectations. After a time there will be actual velocity results from which Invest calculates divergence and what impact that will have on the project delivery. So, at first, enter a size based on how much project work you anticipate this team can complete in a week. It does not matter how many people are in the team. Click on the Team Velocity cell and enter your Ideal Days estimate - that is, days without interruption.

You may already know that some aspects of your team will change over time. For instance, it might be already known that the cost of some resources will change and also their availability. This will have an impact on the team’s velocity. For example, let’s suppose the team is on holiday in December. In that month, the Velocity Change is expected to go down -50%. When the whole team returns in January the Velocity Change increase will be 100% - that is to say, double the figure of December.
IMPORTANT! Note that Invest is not using the original baseline Velocity % to compare changes. If the velocity of a team of 8 people reduces by -50%, that is to say the team size goes down to 4. Later adding +50% to 4 will only be 2. Therefore the velocity increase must be +100% to fully recover.

The Parallelism of the team means how many project tasks it can work on simultaneously. This does not mean that it is working faster, but it may be working smarter. This will affect delivery dates since a team that can do more than one task at a time tends to be able to keep busy while waiting for dependency gaps to fill up.
Work is assigned to the team on the Backlog tab. The size column will be T-Shirt or whatever estimation scale you decided to use.
AUTOMATIC ESTIMATION

You can estimate how much work a team can do, but Invest allows you to have velocity estimates calculated automatically, based on the team's ongoing performance. Although you will begin with manual estimates, as soon as you have Actual performance results for a team (start and end dates), you should set the Team Velocity Per Week column to Automatic !

DASHBOARD - SCOPE

The Scope Chart shows completed deliveries as a blue line, breaking into green, orange and red lines representing forecasted delivery dates as optimistic, likely and pessimistic, respectively. The range between these forecasts is the area called The Cone of Uncertainty. Periodically taking snapshots of your project, rather than simply saving, sets up a series of time points by which you can compare the present with the past.

Click on the icon at the top to expand the Snapshot Timeline.
When you compare two time points, the scope chart will show extra lines indicating original and changed scope. Scope revisions happen when new work is added and/or when more or less work effort is proved necessary over time. Invest will show you ahead of time if you need to make adjustments to resources or expectations to meet the original project goals.

DASHBOARD - COST

Your resources are consuming the project budget which is represented as a horizontal line on the Cost Chart. The chart normally only includes costs within the Start and End Dates of the project. So if you see on the Scope Chart that your forecast deliveries will fall beyond the target project end date, adjust the End Date on the Summary tab if you want to display those surplus costs.

DASHBOARD - RESOURCE UTILISATION
Because this is not always clear from looking at a list of tasks, the Resources Utilisation graph reveals which teams have availability for project work. These gaps open up when the workload is not sufficiently balanced or when dependencies leave one resource team waiting upon another to complete some prerequisite tasks. If a team can manage a higher parallelism and is able to work on several task simultaneously, this will help to fill in some holes, but task reallocation may be the appropriate response.


TAXONOMY
The Taxonomy tab is where capability maturities (or implementation strategy) can be modelled and lists maintained.

GROUPS & SUB GROUPS
Group and Sub Groups help you to organise data of different types. You can make more Groups and Sub Groups.
When Invest starts, you will see two default Groups already in the Taxonomy tab. These are titled Capabilities and Milestones. The Capabilities Group has a Sub-Group with a placeholder title.

CAPABILITY MATURITY WHEELS
A project's capability maturities are a series of states which are progressively more difficult but also more commercially beneficial when attained. For example, in a maturity of location, it will be relatively easier to start selling a product locally rather than globally.

Exercise: In the Capabilites Group, Add a new Subgroup called Location. Notice that a list is created in the lower panel ready to enter levels of maturity. As you enter maturity rows, notice that a spoke is being created in the opposite panel.


To make your modelling easier, as you are deciding on relative order, click and drag maturities on the spoke to different positions. You can edit labels and also add/reorder/delete spokes directly by click and/or drag.


As you add more spokes, the maturity wheel template begins to build. Add some meaningful Joining Words and you will be able to read a whole story clockwise around the wheel rim.


LISTS & LIST GROUPS
It is useful to organise and filter your Backlog work using custom options. In this example, each task is set to a relevant project phase.

These options are a list that was created in the System Wide Lists panel of the Taxonomy tab.

A new list was added and some options were entered, with some colour stylings as desired.


With the list of options available, a suitable Group and Sub-Group was created to use it.
First a New Group was set up to contain a Phases Sub-Group (and any subsequent Sub-Groups that might be needed). Then single row named "Phases" was created and the relevant list chosen from the Type selector.


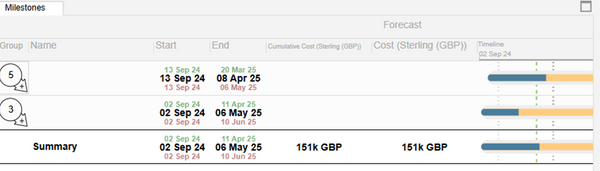
Moving to the Backlog tab, the "My Groups" was made visible in the toggle switches, then an option chosen for each backlog row. Now the tasks can be sorted using the standard filters under the column title. If the Milestones options is selected for any list, it becomes available for display on the Dashboard Milestones tab.


TEXT COLUMNS
Name and Description are columns for text entry in the Backlog. If further columns of free text entry are required, create Groups and Sub-Groups but select the Text Type as an option.

FORMULAS
A library of math formulas is available if you want to process data within Invest Lite.
Please see this link for a list and explanation of the formulas and their parameter requirements.
BACKLOG
CUSTOMISATION
Right click column headers in the Backlog for filter options. Show and hide columns as required to present data in the most relevant way as occasion requires.

Right click column headers in the Backlog for filter options. Show and hide columns as required to present data in the most relevant way as occasion requires.
FORECASTING

To begin making forecasts, Invest will need a row in the Backlog for a each task with a team resource assigned by T-Shirt size (or another scale of relative effort).
When the "Forecast from" field is set, Invest forecasts cost, utilisation, delivery and scope from that date with the assumption that all resources have been updated with the correct current costs, % progress and start dates (and any end dates). You may model scenarios where you forecast from a date in the future or past, but it is highly recommended to forecast from today to better represent actual reality.

IMPORTING EPICS FROM JIRA
If you have a project in Jira , you can import the data into Invest using the upload feature seen in the Backlog when in edit mode. Review the section in this documentation about setting up Resources before starting.

Invest recognises the standard fields of Jira, which are; Summary, Description, Start Date, Due Date, Team, Original estimate and Resolution date. Invest imports issue at the Epic level, but it also notices the completion status of any task and stories pertaining to those epics.
Invest also collects any dependencies between epics. These are established by clicking +Add on the epic screen and choosing a Linked Issue. Dependenies are represented as linking chains on the Jira timeline and as icons in the Invest Line backlog under the Depends On column.

ADVANCED JIRA IMPORT
Invest can import extra custom fields from your Jira project. However, before importing, those new fields should be set up in Invest. In the Taxonomy tab, create Groups, Sub-Groups and field rows for each of your Jira custom fields. The import is case sensitive, so the names of your Invest group rows must match exactly. If your Jira fields are selection types, create lists of corresponding options and choose them for your custom field type. If your Jira custom field is a text type of data - like a name or the Issue key - then just select the row type as Text.

MORE ADVANCED JIRA IMPORT
For basic use, Invest assumes that your Jira project has one team working on each of its epics.
However, Invest suggests that you can create custom fields in Jira to represent multiple teams that can work on individual issues within a single Epic.
In your Jira project, go to Custom fields and create a Select List (single choice).
For this custom field, enter a team name using Team as the first word, then your choice of a name, then end with the word Estimate. So the result looks like Team Something Estimate.
Add all the options for a relative effort scale. For example, standard t-shirt sizes are XXS, XS, S, M, L, XL, XXL, OMG


For each team, create two more Jira custom fields for its Start and End date. Again the date field naming format should follow the previous naming pattern. For example, Team Something Start Date and Team Something End Date

Now Invest will import Epics with your Jira teams with their effort estimates and dates

PROJECT HISTORY COMPARISON
A powerful tool for Project Managers is the ability to show, in graphic terms the effect of changes in scope and cost on budget and delivery. Invest allows project comparison between saved dates - for example, the baseline expectations vs the current status.
Every time you Save in invest, there is an option to take a snapshot of your project in its present state
Click the Snapshot view icon to see your snaphots in a timeline
Click on any of the snapshot dots to review your project

Select a snapshot then use the comparison tool to see the state of the project between those points in time.

Look at the Backlog. A comparison column is activated to show which work has changed in scope or stayed the same or has been added betweentimes.

Look at the Dashboard. New scope lines appear on the Scope Chart showing the difference between the baseline expectations and the current status and forecasts.
